Showing posts with label DIY. Show all posts

4.20.2011

The WarLock Wedding: Save the Date!

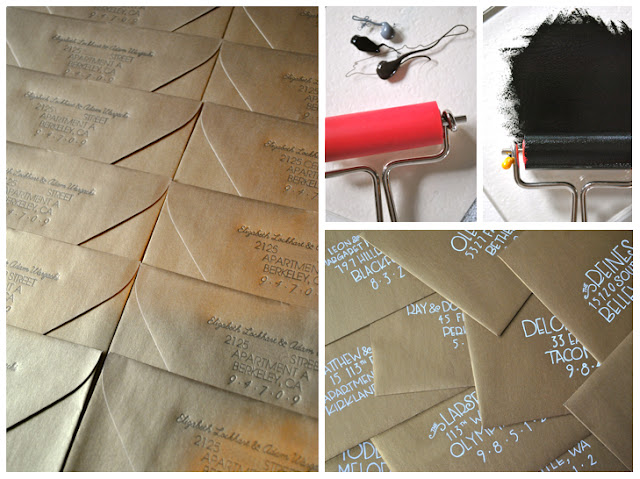
Adam and I wanted our save-the-date cards to be truly personal... so I designed, letterpressed, and hand-addressed them all myself. Here they are!


The cards are traditional but witty, illustrating a piece of who we are as a couple: we love to dine finely in good company! They are enclosed in shimmery gold envelopes that should gleam in each guest's mailbox. I printed my return address onto the pointed envelope flap, and scripted the recipients' addresses in white ink. My hope is that it will be as exciting for our friends and family to receive this news as it is for us to send it. We absolutely cannot wait to celebrate with everyone!

Photographs & Design © ShocktheBourgeois


3.30.2011

Spring Gallery

Last week's visit from a swallowtail butterfly prompted me to add some signs of Spring to my decor, starting with a new gallery wall in my living room.


I've been tweaking my living room for months trying to get it just right. When my workspace was featured in Where We Blog From back in November, my desk occupied the corner by the windows. To make the room more comfortable for my Thanksgiving guests, I rearranged and hung new art (as seen below). 


It was an improvement, but the art looked stale and washed-out to me. Finally, last week I found the solution! The Ikea picture ledges allow me to layer frames for more impact, and their modern lines make my eclectic art collection look more graphic than granny. I also realized that I was using the wrong metallic- doesn't that antiqued gold look warm and rich against my mauvey-gray walls? I'm still waffling on adding more color to my decor, but for now, a little glimpse of blue sky goes a long way!


The cloud painting is a promo postcard from an art gallery, and my set of vintage butterfly prints ($5 on eBay years ago) acknowledge the season. The framed W (for WarLock, of course) is perhaps my cheapest and easiest DIY to date. I picked up the golden letter ornament for $1 at Restoration Hardware, mounted it directly onto the cardboard backer of the Ikea frame, and added a guinea feather for good measure. Under $20, under 20 minutes, and I love it. It ties the colors and textures of other pieces together, and the curved line of the feather balances the arrangement. It also happens to be a preview of the themes I'm using for the wedding... so I get a little "I-can't-wait" thrill every time I look at it!


The last and best addition to the living room is the industrial swing-arm wall lamp, a lucky $30 find at Jeremy's in Berkeley. I'd purchased it for my bedroom, but it did something amazing for this formerly  unlit and unloved corner: it turned it into the coziest nook in the house.

I think I'm finally on to something. Anyone else redecorating this Spring?

2.11.2011

Paper Heart

I'm feeling particularly lovey-dovey this year, what with all the wedding planning going on, so I decided to put together some valentines for family and friends...

Shimmery paper banners, suede hearts, a favorite photo, and simple sentiments. 

Beyond valentines, I'm also designing save-the-date cards and other paper goods for the wedding, which I'll be printing myself with my new Epic 6 letterpress! I told you I was feeling ambitious- I've practically transformed our dining room into a little stationery studio. However, I'll be taking a day off for a romantic drive up to Sausalito with Adam this weekend. It is Valentine's Day, after all!

xoxo,

Elizabeth


12.14.2010

Stockings Hung with Care

Our apartment is sans fireplace, which means that Santa's going to have to find an alternate point of entry, and I had to make do without a mantle. I hung our stockings with fleur de lis picture nails on a bare wall in our living room. They were shimmery and festive, but something was missing...


They needed a personal touch, but I'm not handy enough with needles and thread to take on embroidery. Instead I drew out petite banners on black paper and scribbled in all of the WarLock family names...


Now it's perfectly clear where all the coal should go!


We're sharing with the kitties, so most of the stocking stuffers will be catnip treats. Matilda loves unwrapping her own presents (last year she even retrieved them from under the tree), and we figure that Phinney will be thrilled to have paper to shred and new toys to play fetch with. There will be a few presents for Adam and I as well, and since I'm doing the shopping, I already know I love them!


We're looking forward to two more sets of thoroughly stuffed stockings when we go home to Washington for the holidays. Adam has a large family, and this year each person is responsible for contributing some goodies to three other stockings. Everyone will end up with a fun assortment! My family saves the stockings until very last, to be emptied and giggled over as we finish our coffee. 

Are stockings part of your Christmas tradition?

12.10.2010

How to Make Perfect Paper Snowflakes

12.07.2010

Adding Holiday Sparkle

Remember the acrylic crystals that I used to accessorize my tree? They're adding sparkle to the rest of the apartment as well! I strung crystals of different sizes on fishing line (using cheap sparkly beads to hide the knot) and hung them wherever they'd catch the light.


It's always important to me to make my little apartment look as sophisticated as possible, and that can be tricky with all of the kitschy holiday red and green out there. I limit my color scheme, because too many colors in a small space can be a visual assault. I scatter matching pieces so that each room refers to the others. By using a few recurring themes, like these crystals, even Christmas decor can look polished!


There is one crafty winter tradition that I insist upon: paper snowflakes. Each year I make a flurry of them for my windows and keep them up through January. And, this year I'd like to share them with you- I'll be posting a paper snowflake tutorial this Thursday, so have your scissors ready!

12.02.2010

Here & Now: Our Living Room

I don't know if you can tell from this photo, but energy levels are pretty low here today.


I find myself in the mid-holiday doldrums, and since we polished off the last bits of Ferdinand last night, I can't blame it on the tryptophan! After a lively weekend with my family, I'm downright exhausted. But, before I add a shot of espresso to my hot chocolate and start lighting this place up for Christmas, I thought I'd give you a few peeks at our living room.


I used my family's visit as an excuse to shuffle the furniture, and I'm pleased with how it turned out! As you might remember from my Where We Blog From pictures, my desk used to be situated by the window, an arrangement that wasn't terribly welcoming to guests. I switched the positions of my workspace and our petite sofa, and finally the living room looks just right. My desk is now nestled into a corner with our bookcases, creating a snug home office. The settee now has a better angle on the television and the perfect vantage point for our busy street view. There's more floor space for Phinney's antics and more wall space for art!


If you're an astute observer, you'll notice I've got new art on the walls. The large piece is actually...


My beloved feather placemats, aka my blog header! Daily use had caused them to molt heavily, and they were looking pretty pitiful on my table. The frame and matting was a freebie from an old job, and I'd never found artwork that was a good fit- but I loved the antiqued gold edge on the frame, and it was the perfect focal point for my new gallery wall above the couch. So, I simply layered in the placemats for an abstract look that compliments my soft neutral color scheme!

I'm using a neutral palette for my holiday decor as well, with lots of silver and gold. Adam and I are getting our very first Christmas tree tonight, and I can't wait to show it off!

10.28.2010

A DIY Borrowed from Maggie Rose

A while back Maggie posted a tutorial for beautifying a bulletin board, and I was inspired. Bulletin board? Check. Extra fabric? Check. Tacks? Check. 20 minutes to spare? Check!

Mine didn't turn out as beautifully as Maggie's did, as I used plain old tacks instead of handsome brass upholstery nails (and I won't even pretend that I spaced them evenly), but now it complements my color scheme!

I thought I'd show it off since it's currently costumed for Halloween...


Thanks to Maggie for the great idea and instructions!

Did anyone else dress up their inspiration board for Halloween?


8.06.2010

Here & Now: Modest Improvements

After 6 months of working on my Berkeley apartment (I know, I can hardly believe it either) we're almost there. It's becoming evident in my weekend to-do lists. We've checked off "unpack books" and "paint bathroom." Now it's time for the finishing touches- "style china cabinet" and "hang inspiration board."

Who would've thought our dumpy bathroom could become one of the prettiest spaces in the apartment?

I love the way our art pops against our moody greige walls.

Here's to Friday and to wrapping things up this weekend. I can hardly wait to show you the whole apartment!

7.26.2010

D-I-Whyyyyyyyyy!

Here's a pet peeve for you: when a weekend project stretches into a Monday project.


Consider this a PSA to all you DIYers out there. Having run out of my go-to aerosol paint stripper, my enthusiastically green local hardware store guilted me into trying Ready Strip. The label states that the product takes at least 30 minutes to be effective, but I figured I was better off killing time than braincells. Ha! Let's see if I can reenact the process for you.

30 minutes after application: Is it ready to strip? Hmm. No.
1 hour: Ready? No.
4 hours: No.
8... 12... 24: No, no, NO!

Hour after hour, this useless goop just sat on top of the paint. When I finally got frustrated with all of the pointless scraping and reapplication, I gave up- only to find that cleaning up this disgustingly sticky mess would take another hour of scrubbing. Now I've got a patchy chair and a whole lot of aggression (though I guess that might help with the sanding process).

What a disaster! Anyone else have a DIY-Gone-Wrong to share?

1.15.2010

In the Cards

Once, as a little girl, I received a deck of tarot cards as a gift. I couldn't make heads or tails or cups or swords of the whole thing, but I loved the illustrations!

Tarot cards are steeped in history and symbolism, depicting classic archetypes of the human experience. Adam may raise an eyebrow to the occult association, but he's a Joseph Campbell enthusiast and an avid student of Medieval literature. I wonder if I could persuade him to consider some tarot art in the new place?

I've seen individually-framed cards before, and I caught a glimpse of this giclee in a house tour. The cards are divine in this 3x3 presentation, but I'm not so excited by the illustrations (or the price).

I did, however, have way too much fun with the new feature at AllPosters that allows you to view pieces "on the wall" in a selection of styled rooms. Yeah. Way too much fun.

I foresee a DIY project for the Berkeley apartment. I like the style of the Rider-Waite-Smith deck, but the bright yellow and orange throws me. Perhaps I'll trace and hand-color my own (especially if I'm unemployed for any length of time).


Images from the Rider-Waite-Smith deck courtesy of Tarot Experts & Instant Oracle

I'm not superstitious, but I might do a little research first to make sure I don't hang some dire prediction on my wall! What do you think?

1.05.2010

Editorial Eye & Ire

Okay, Apartment Therapy, thank goodness you're through with that year-in-review nonsense and back to business. Without your controversial topics I had no outlet for my snark. I can't believe I made it through the holidays without venting into my usually well-mannered blog.


Well, I almost made it.
Over the extended weekend I picked up a copy of Fresh Home, a design magazine that premiered in June. 


I bookmarked instructions for applying silver leaf to furniture, and I found several lovely images, but on the the whole, it just didn't speak to me. This is strange, because Fresh Home is supposed to be targeted to the frugal under-30-year-old who wants to infuse their own style into their home. That's me, right? 
The thing is, I turn to magazines for images that inspire and success stories that I can aspire to. I don't think frugality limits us to childish crafts, canned advice, or furnishing our homes in one stop at the mall (as a "round-up" from 5 stores would suggest). As I read Fresh Home, I couldn't help but feel that their cutesy editorial copy integrated too cleanly with their advertising- and I didn't like what I was being sold. I can't be too critical, because let's face it- the deceased Domino and the living Living set the bar high. That being said, if Martha can put out a flawless magazine every month, I see no excuse for sloppy editing in a quarterly publication.


For example. Here, a kitchen spread.

A page or so later, the same kitchen appears (upper right corner): totally different oven. 


How does that even happen?


I'm disappointed, because I so want to support a new design mag and keep the industry alive... but next season I'll save my $5.00 for a Craig's List find or a can of spray paint. If I want a DIY project, I better do it myself. And if I want a style idea, I'll refer to my Domino archives and shed a tear for the late great.

12.16.2009

It's a Wrap

I'm running a little behind today, so I'm going to postpone the third installment of Adam's Salmon Bisque Tutorial until tomorrow- many apologies to those of you craving soup!


You may be wondering why the blog has been a little quiet this week.  I've been having so much fun at my day job that I've been neglecting my hobby!  I've had the great pleasure of putting together my company's annual client and associate gift.


My task was to dress up a bottle of wine in a way that represents the company and celebrates the season.  Think of it as one part marketing to five parts good cheer. Here's what I came up with...


The wine boxes are from Paper Mart, an excellent online source for packaging materials. I worked with a local printer to have the company logo applied to each box in metallic silver ink. Each box is stuffed with shredded plans- much more attractive than multi-colored crinkle filler, and a great way to recycle! A trip to the hardware store produced hex nuts, flat washers, fishing line, notched washers, and mirror florets. These inexpensive materials are sparkly, but definitely relevant for a construction company! I strung them with beads to make simple gift tags into ornaments.


They resemble snowflakes, and each one is different!


After I wrap-up this task, it's on to the next: wrapping up my own Christmas gifts! I'm going to be using the same hardware for my own gifts, but I'll style them with a bit more festive whimsy. If you're bored of the same-old store-bought bow, I'd recommend you give this a try. It's a very approachable project (and you can use up all the extra parts and pieces in your junk drawer!).


Because I had to be a thrifty gifter this year, it's especially important to me to go all-out with extravagant packaging. Presentation is everything- and a gift doesn't have to cost a fortune to look like a million bucks.


Ah, I love wrapping gifts. It's my favorite part of Christmas! Don't suppose anyone has any extra presents I could decorate?


11.16.2009

Easy as Pie

Adam and I have been cooking up some ideas about how to share his talents with y'all while he's living in the Gourmet Ghetto. Of course, all of our ideas rely on an internet connection at home (because it might be a little weird to present a turkey-prep how-to video on borrowed wi-fi at Peets, no?).

While we're waiting for him to get online, I thought I'd present one of the few edibles that I can make BETTER than Adam can (that's right, Wargacki, I'm tossing down the gauntlet).

Apple Pie

Making pie is one of my greatest pleasures in life. Unlike Adam, I don't cook well under pressure. I favor recipes that allow me to take it slow- chop, stir, taste, season, taste again. I also love to cook by intuition, adding whatever strikes my fancy. I have made dozens of variations on my apple pie (orange spice, huckleberry, sour apple, and rum-soaked to name a few), and I can never decide which is my favorite. Of course, the key to getting creative successfully is to start with a basic, no-fail recipe and elaborate from there.

For a perfect apple pie, you'll need the following:

  • 4 or 5 apples. Always have one more apple than you think you'll need. You will likely take a bite or two while you're cooking. I like to select 3 or 4 sweet red apples (not red delicious, which I find pretty tasteless) and 1 or 2 tart green apples. All of the apples should still be pretty crisp and fresh- we're not making applesauce here.
  • 2 refrigerated rolled pie crusts. Yes. Store bought. In the interest of time and not pulling our hair out here, let's save pie crusts for another day. Nobody will mind (and if they do, you may confiscate their slice).
  • Flour
  • Salt
  • Brown Sugar
  • White Cooking Wine
  • Lemon Juice or Orange Juice
  • Cinnamon, Nutmeg, Cloves, Allspice, or whatever else you like
  • An Adorable Pie Pan (probably 9" or 9.5")
  • Cookie Cutters of your choice
First off, toss your measuring cups. Measuring will just take the fun out of this very easy project. Then, proceed as follows.
  1. Get your pie crusts out of the fridge and let them warm to room temperature.
  2. Set out a large bowl and add a few squirts of citrus juice. Peel an apple and chop it into roughly 3/4" chunks. Toss each chopped apple into the citrus juice immediately to prevent it from browning.
  3. When all of your apples are ready, add a couple pinches of salt and enough cinnamon to turn them all speckly and spicy. Add the other spices to taste.
  4. Pour in about 3/4 a cup of white wine. Give the apples a good stir and let them soak up the wine a bit. While they're marinating, you should probably soak up a cup of wine as well.
  5. Drop in at least 1/2 a cup of brown sugar. Stir as you're adding it- it should dissolve a bit in the wine, creating a nice syrup.
  6. Add flour- just a little at a time until the apples are coated in sugary goo. You cannot mess this up. If you add too much and it gets too stiff, add a little more wine. If it's so thin that it doesn't stick to the apple chunks, keep stirring in flour.
  7. Taste an apple or two. It should be delicious at this point. If it isn't, up the quantity of the flavor that it's missing, or dilute with more wine and flour.
  8. Preheat your oven to 400ยบ.
  9. Set your apples aside and unroll one pie crust. Set it into your pie pan, making sure that the edges don't drape too far over the sides. I like to pinch the edges into a ruffly pattern. Don't get too picky. This is a pie, not a freakin' wedding cake.
  10. Pour in your apple mixture, and pack it in as much as possible. Don't overfill or it will drip out as it's cooking. If you have leftover filling, don't fret- save it for your oatmeal the next morning (trust me, do it).
  11. Unroll your second pie crust onto a cutting board and have at it with your cookie cutters. Get creative. Get squirrelly, if need be. I dusted my squirrels in cinnamon to make them stand out amongst the trees.
  12. Arrange your shapes on top of the pie, leaving a few gaps. Taste a scrap of pie crust- if it's bland, you may want to brush on a little butter.
  13. Place your pie in the oven and set a timer for 20 minutes. When the timer goes off, the edges of the crust should be getting pretty golden- remove your pie and cover the edges with strips of tin foil so they don't get burnt.
  14. Put the pie back in the oven for about 30 minutes, or until everything is looking nicely browned and you cannot resist the lovely aroma any longer.
  15. Let the pie cool on a rack briefly and arm yourself, because you'll have to guard it against nibbling family members.
  16. Slice and enjoy.
Make sure that you get a piece!

Really, that's it! Recent studies in my household have shown that everyone loves apple pie. 100% of parents polled said that this pie was "damn tasty," with 100% of dads going back for a second slice. Baking this delicious pie will increase your culinary renown by up to 68%, while making you 73% more likely to get roped into desert duty for Thanksgiving. It's a fact, people, I am the Queen of Apple Pie. Eat that, Cook Adam.

Mmmm, Mmmm, Mmmmm.